Unity에서 1인칭 카메라를 구현해보자.
조작 방식은 다음과 같다.
이동 : W(앞), A(왼), S(뒤), D(오), Q(아래), E(위)
회전 : 마우스 우측버튼 클릭후 드래그
확대/축소 : 마우스 휠
부스트 : 왼쪽 Shift
초기화 : 스페이스바
일인칭 카메라의 조작을 담당할 클래스(FPSCameraController)를 생성한다.
using System.Collections;
using System.Collections.Generic;
using UnityEngine;

public class FPSCameraController : MonoBehaviour
{
    public float SpeedMove;     //카메라 이동 속도
    public float SpeedRotate;   //카메라 회전 속도
    public float SpeedZoom;     //카메라 확대/축소 속도

    public float Min_Fov;   //카메라 Field Of View 최소값
    public float Max_Fov;   //카메라 Field Of View 최대값

    private Camera _camera;
    private float _rotX = 0f; //카메라 x축 회전값
    private float _rotY = 0f; //카메라 y축 회전값
    private bool _isBoost = false;

    //초기화용 값
    private Vector3 _originPos;
    private Quaternion _originRot;
    private float _originFOV;


    private void Init()
    {
        //초기화
        transform.position = _originPos;
        transform.localRotation = _originRot;
        if (_camera) _camera.fieldOfView = _originFOV;

        _rotX = transform.localRotation.eulerAngles.x;
        _rotY = transform.localRotation.eulerAngles.y;
    }

    private void Move()
    {
        //이동
        if (Input.GetKey(KeyCode.LeftShift))
        {
            _isBoost = true;
        }
        else
        {
            _isBoost = false;
        }

        var speed = _isBoost ? SpeedMove * 2f : SpeedMove;

        var moveX = Input.GetAxis("Horizontal");
        var moveY = Input.GetAxis("UpDown");
        var moveZ = Input.GetAxis("Vertical");

        transform.position += (transform.right * moveX + transform.up * moveY + transform.forward * moveZ).normalized * (speed * Time.deltaTime);
    }

    private void Rotate()
    {
        //회전
        if (!Input.GetMouseButton(1)) return;

        var moveX = Input.GetAxis("Mouse X") * Time.deltaTime;
        var moveY = -Input.GetAxis("Mouse Y") * Time.deltaTime;

        _rotX = Mathf.Clamp(_rotX + moveY * SpeedRotate, -85f, 85f);
        _rotY = _rotY + moveX * SpeedRotate;

        transform.localRotation = Quaternion.Euler(_rotX, _rotY, 0f);
    }

    private void Zoom()
    {
        //확대 및 축소
        if (_camera == null) return;

        var zoom = Input.GetAxis("Mouse ScrollWheel");

        var resultFOV = _camera.fieldOfView + zoom * SpeedZoom;

        if (resultFOV > Max_Fov)
        {
            _camera.fieldOfView = Max_Fov;
        }
        else if (resultFOV < Min_Fov)
        {
            _camera.fieldOfView = Min_Fov;
        }
        else
        {
            _camera.fieldOfView = resultFOV;
        }
    }

    // Start is called before the first frame update
    void Start()
    {
        _camera = GetComponent<Camera>();

        _originPos = transform.position;
        _originRot = transform.localRotation;
        if (_camera) _originFOV = _camera.fieldOfView;

        Init();
    }

    // Update is called once per frame
    void Update()
    {
        Move();
        Rotate();
        Zoom();

        if (Input.GetKeyDown(KeyCode.Space))
        {
            Init();
        }
    }
}
여기서 해줘야 할 작업이 하나 있다.
Move() 함수 안의 Input.GetAxis("UpDown")을 위한 작업이다.
기본적으로 프로젝트를 생성하면 InputManager에 등록된 Axis값중 "Horizontal", "Vertical"은 있다.
새로 추가해줘야 할게 "UpDown"이다.
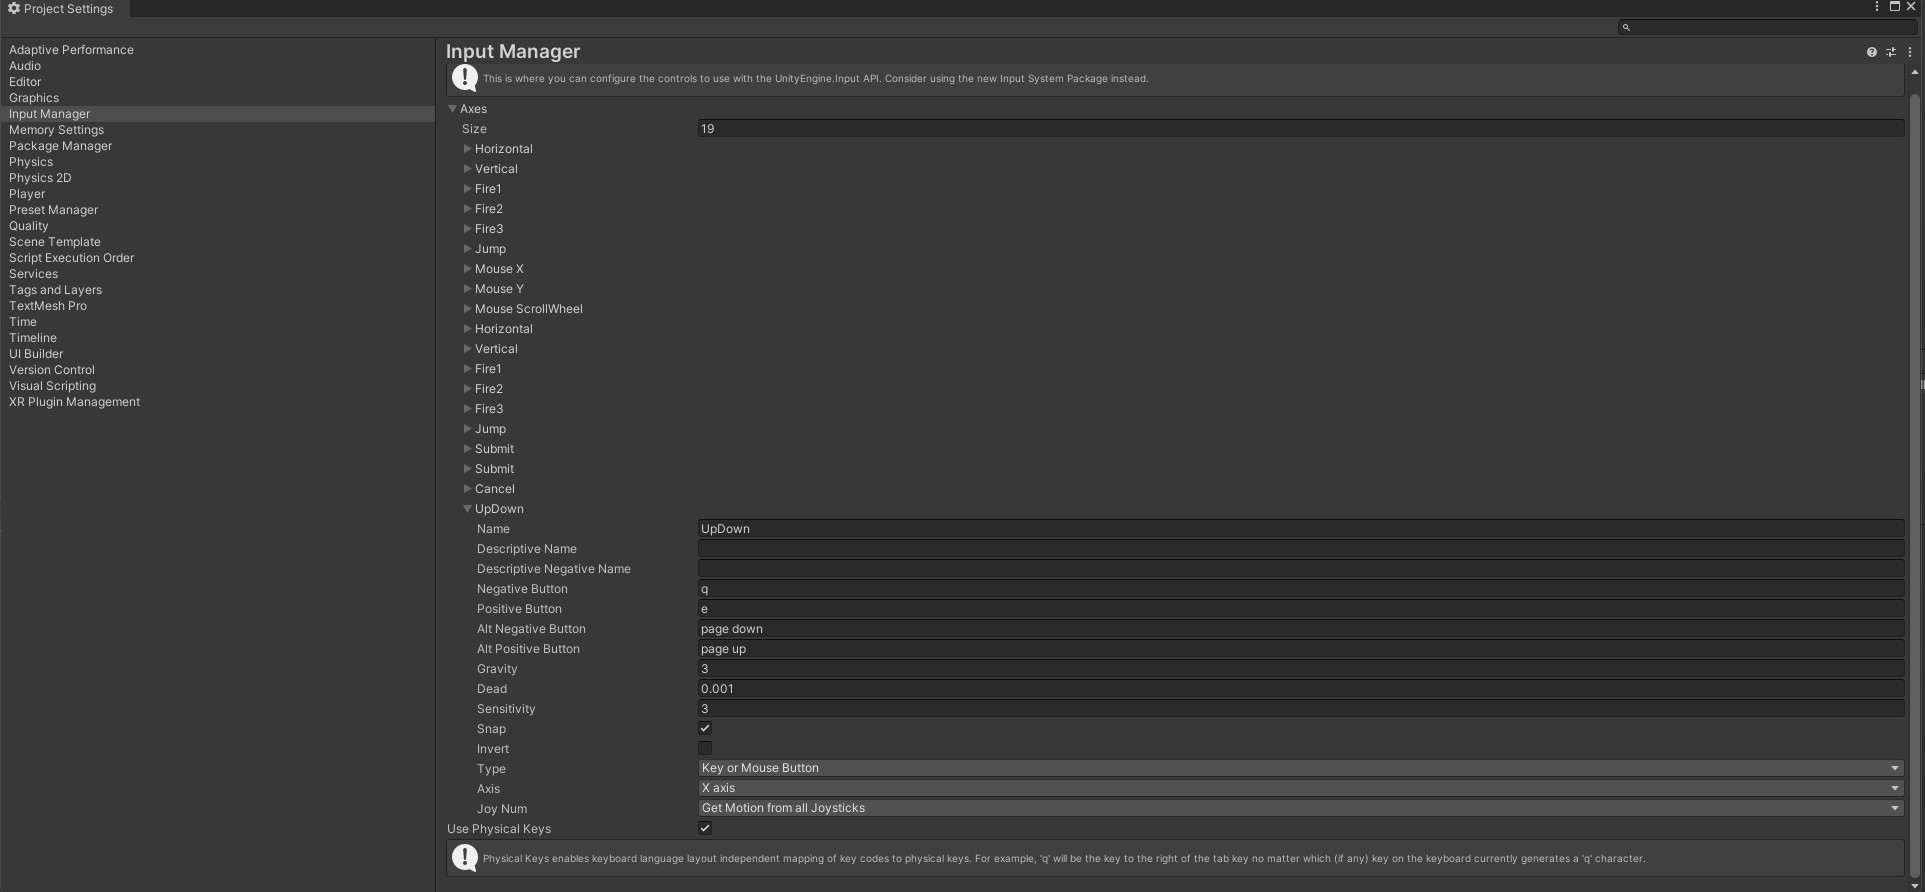
유니티 에디터의 상단메뉴에서 Edit>Project Settings>Input Manager 에서 Axes값에 "UpDown"을 사진 처럼 추가해준다.
위 작업까지 마치고 나면 카메라에 해당 클래스를 넣어주면 된다.
'Study > Unity' 카테고리의 다른 글
| [Unity Shader] 1. 유니티 셰이더 소개 (0) | 2023.06.27 |
|---|---|
| 3인칭 카메라 구현 (4) | 2023.06.09 |
| Unity Shader - 등고선 shader만들기 (0) | 2022.07.30 |
